1. Overview (ସଂକ୍ଷିପ୍ତ ବିବରଣୀ)
1a. Purpose (ଉଦ୍ଦେଶ୍ୟ)
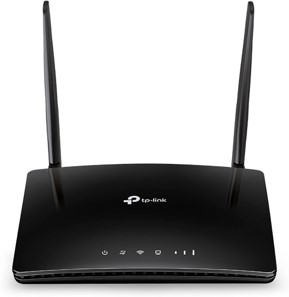
The TP-Link – Router is a standalone wireless router that uses a cellular SIM card to access the Internet instead of a phone line or fiber cable. It has a mobile internet modem to connect to widely deployed 4G mobile broadband networks.
TP-Link – Router ଏକ standalone wireless router ଅଟେ ଯାହା ଇଣ୍ଟରନେଟ୍ ଅଭିଗମ ପାଇଁ ଫୋନ୍ ଲାଇନ୍ କିମ୍ବା ଫାଇବର୍ କେବଲ୍ ପ୍ରୟୋଗ କରିବାର ବଦଳରେ ଏକ cellular SIM card ବ୍ୟବହାର କରେ। ଏହାରେ ଏକ mobile internet modem ଅଛି ଯାହା ବିସ୍ତୃତ ଭାବରେ ଚାଲିଥିବା 4G mobile broadband ନେଟୱର୍କସ୍ ସହିତ ଯୋଡ଼ାଯିବା ପାଇଁ ଉପଯୋଗୀ।
NOTE: It also has a WAN port provided for a phone line or fiber cable.
This flexibility ensures reliable internet connectivity in various scenarios.
NOTE: ଏହାରେ ଏକ WAN port ମଧ୍ୟ ଦିଆଯାଇଛି ଯାହା ଫୋନ୍ ଲାଇନ୍ କିମ୍ବା ଫାଇବର୍ କେବଲ୍ ପାଇଁ ବ୍ୟବହାର କରାଯାଇପାରେ। ଏହି ସୁବିଧା ଏହାକୁ ବିଭିନ୍ନ ସେନାରିଓରେ ବିଶ୍ବସନୀୟ ଇଣ୍ଟରନେଟ୍ କନେକ୍ଟିଭିଟି ସୁନିଶ୍ଚିତ କରେ।
1b. Network and Connectivity (Network and Connectivity)
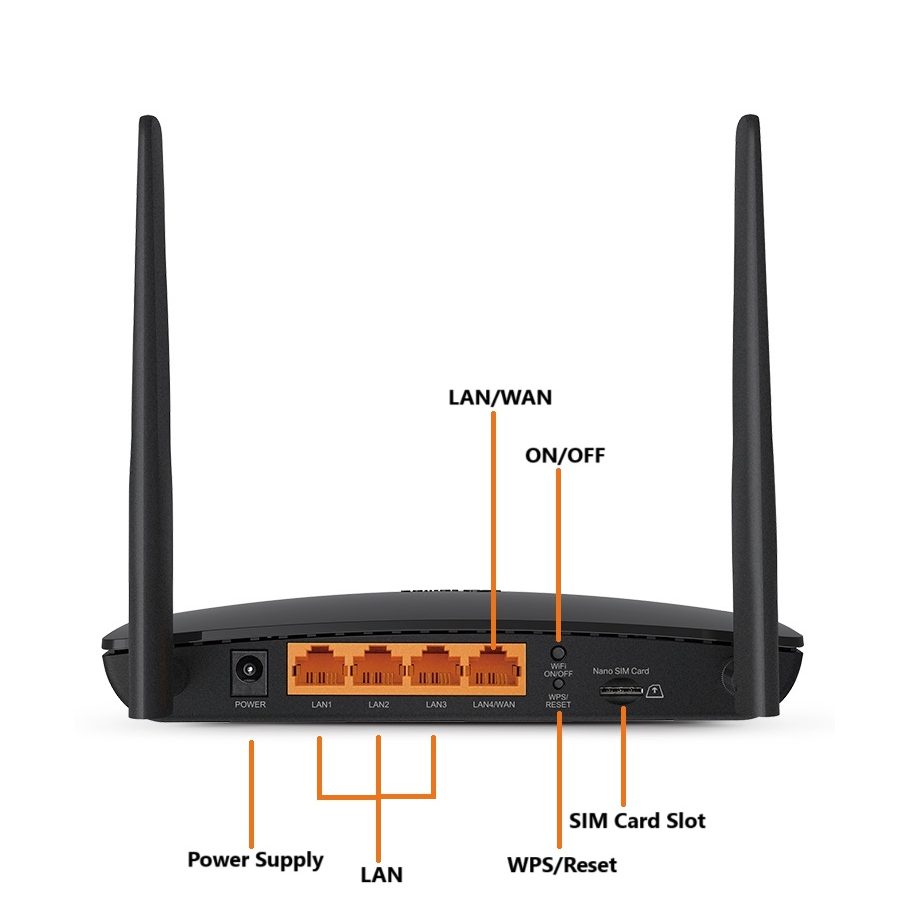
The user can insert a 4G-enabled nano-sim in the available sim port to provide internet to the router. There is a secondary option to connect via WAN cable.
ବ୍ୟବହାରକାରୀ ସେ available sim port ରେ 4G-ସମର୍ଥିତ nano-sim ସିମ୍ ଲାଗାଇ ପାରିବେ ଯାହା router କୁ ଇଣ୍ଟରନେଟ୍ ଦେବ। ଏହା ସହିତ ଏକ ଦ୍ୱିତୀୟ ବିକଳ୍ପ WAN କେବଲ୍ ମଧ୍ୟ ଅଛି।
Once the Router is provided with Internet, it can be connected wirelessly to the IFP display through Wi-Fi.
ଯେତେବେଳେ Router କୁ ଇଣ୍ଟରନେଟ୍ ସହିତ ସଂଯୋଜିତ କରାଯାଇଥାଏ, ସେତେବେଳେ ଏହା Wi-Fi ଦ୍ୱାରା IFP display ସହିତ ବେଳାସ୍ତ କରାଯିବ।
Wireless (ତାରବିହୀନ)
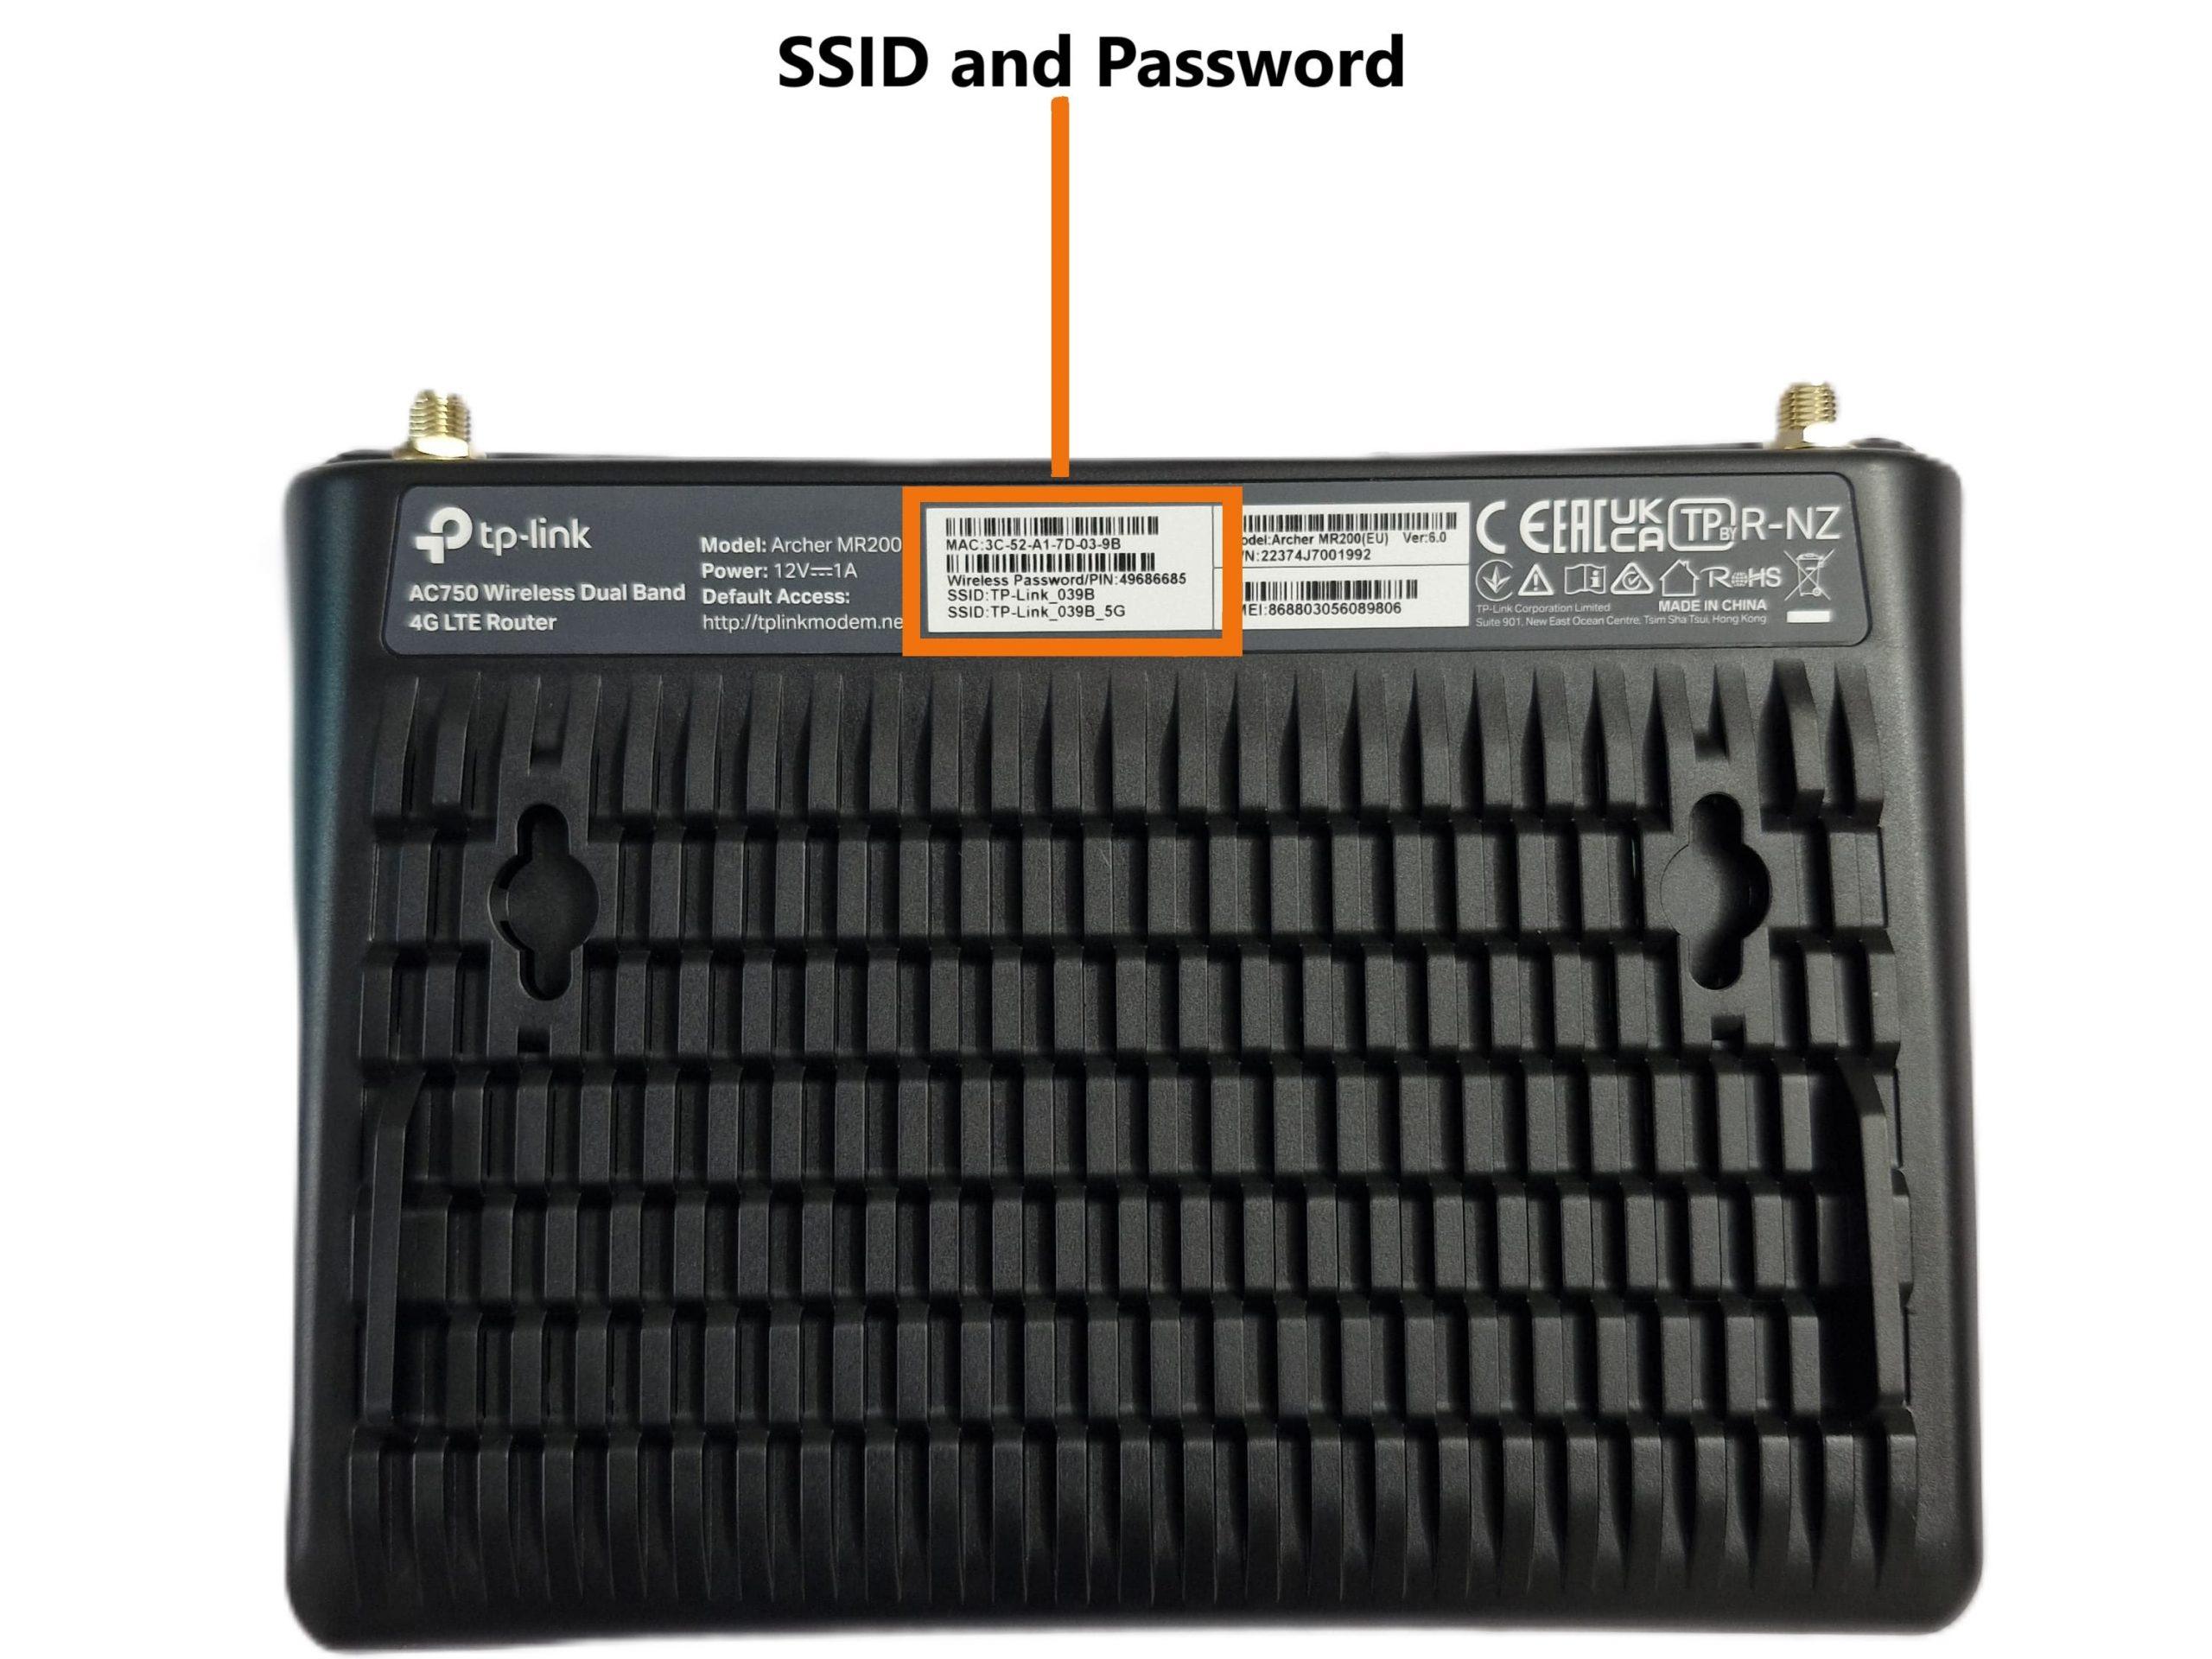
- Find the SSID (network name) and wireless password printed on the label at the bottom of the router. Router ର ତଳ ଭାଗରେ ଥିବା ଲେବେଲ୍ ରେ SSID (ନେଟୱର୍କ ନାମ) ଏବଂ ବୋଧିକାରୀ ଲୋକାଲ୍ wireless password ବିଭାଗ ପ୍ରିଣ୍ଟ କରାଯାଇଛି।
- Click the settings icon on the IFP display and select Internet, then select the SSID and enter the password to join the network.IFP display ରେ settings ଆଇକନ୍ ଉପରେ କ୍ଲିକ୍ କରନ୍ତୁ ଏବଂ Internet ବିକଳ୍ପକୁ ବାଛନ୍ତୁ, ପରେ SSID ବାଛିବେ ଏବଂ ପାସୱାର୍ଡ ଲେଖିବା ପରେ ନେଟୱର୍କ ସହିତ ସଂଯୋଜିତ ହେବା ପାଇଁ join କରନ୍ତୁ।
1c. Indicators (ସୂଚକଗୁଡ଼ିକ)
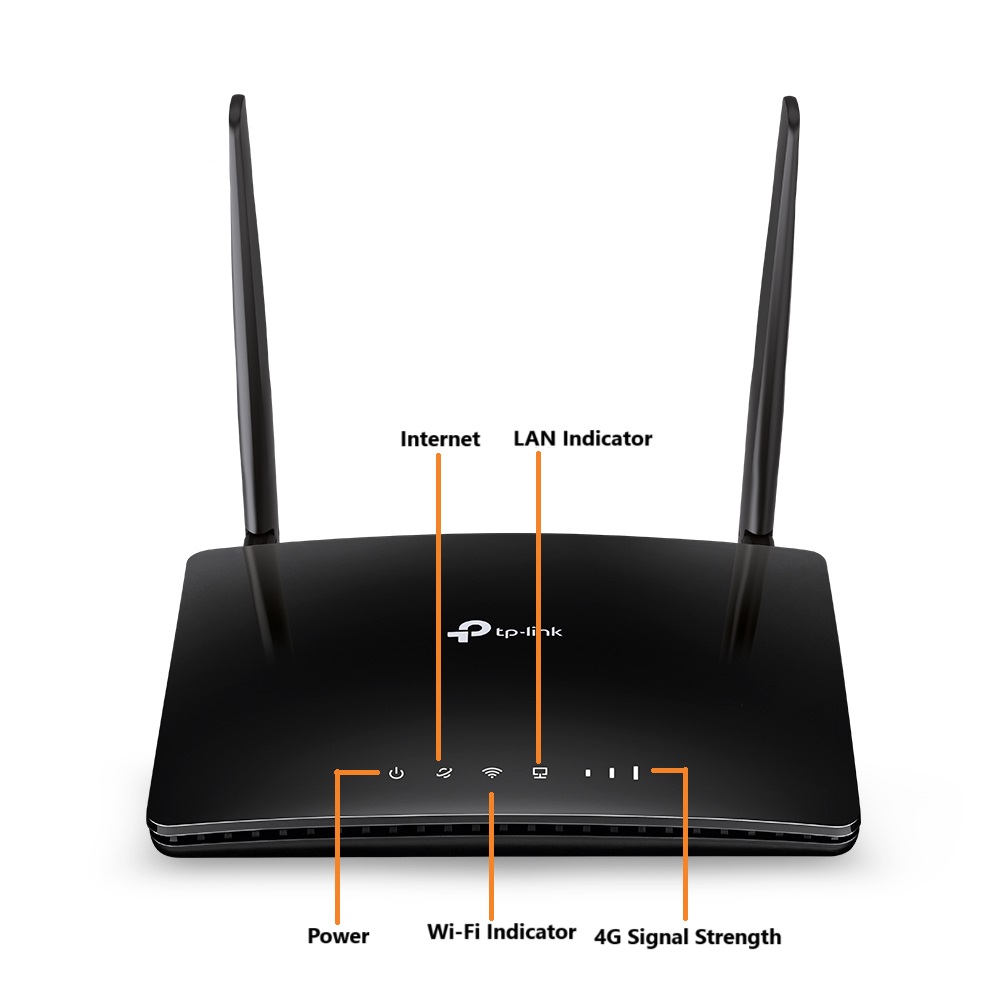
Check the LEDs’ status. If the Internet LED (🌐) is on, your router is connected to the internet successfully.
LED ର ସ୍ଥିତି ଯାଞ୍ଚ କରନ୍ତୁ। ଯଦି ଇଣ୍ଟରନେଟ୍ LED (🌐) ଚାଲୁ ଅଛି, ତେବେ ଆପଣଙ୍କର ରାଉଟର ସଫଳତାର ସହ ଇଣ୍ଟରନେଟ୍ ସହିତ ସଂଯୁକ୍ତ ହୋଇଛି।
| LED (ଏଲ୍ଇଡି) | Status (ସ୍ଥିତି) | Indication (ସଙ୍କେତ) |
| Power | On/Off | Power is on or off. ପାୱାର ଚାଲୁ କିମ୍ବା ବନ୍ଦ ଅଛି। |
| Flashing | The system is starting up, or the firmware is being upgraded. Do not disconnect or power off your router. ସିଷ୍ଟମ୍ ଆରମ୍ଭ ହେଉଛି, କିମ୍ବା ଫାର୍ମୱେର୍ ଅପଗ୍ରେଡ୍ ହେଉଛି। ଆପଣଙ୍କର ରାଉଟରକୁ ବିଚ୍ଛିନ୍ନ କିମ୍ବା ବନ୍ଦ କରନ୍ତୁ ନାହିଁ। | |
| Internet | On/Off | Internet service is available or unavailable. ଇଣ୍ଟରନେଟ୍ ସେବା ଉପଲବ୍ଧ କିମ୍ବା ଉପଲବ୍ଧ ନାହିଁ। |
| Wi-Fi | On/Off | Wi-Fi is enabled or disabled. ୱାଇ-ଫାଇ ସକ୍ଷମ କିମ୍ବା ଅକ୍ଷମ ଅଛି। |
| Flashing | WPS connection is in progress. This may take up to 2 minutes. WPS ସଂଯୋଗ ପ୍ରଗତିରେ ଅଛି। ଏଥିରେ 2 ମିନିଟ୍ ପର୍ଯ୍ୟନ୍ତ ସମୟ ଲାଗିପାରେ। | |
| LAN | On | At least one LAN port is connected. ଅତି କମରେ ଗୋଟିଏ LAN ପୋର୍ଟ ସଂଯୁକ୍ତ ଅଛି। |
| Off | LAN port is not connected properly or No LAN port connected LAN ପୋର୍ଟ ଠିକ୍ ଭାବରେ ସଂଯୋଗ ହୋଇନାହିଁ କିମ୍ବା କୌଣସି LAN ପୋର୍ଟ ସଂଯୋଗ ହୋଇନାହିଁ | |
| Signal Strength | On | Indicates the signal strength received from the mobile internet network. More lit bars indicate better signal strength. ମୋବାଇଲ୍ ଇଣ୍ଟରନେଟ୍ ନେଟୱାର୍କରୁ ପ୍ରାପ୍ତ ସିଗନାଲ ଶକ୍ତିକୁ ସୂଚିତ କରେ। ଅଧିକ ଆଲୋକିତ ବାର୍ ଭଲ ସିଗନାଲ ଶକ୍ତିକୁ ସୂଚିତ କରେ। |
| Off | There is no mobile internet signal. ମୋବାଇଲ୍ ଇଣ୍ଟରନେଟ୍ ସିଗନାଲ୍ ନାହିଁ। |
2. Router Set-up (ରାଉଟର୍ ସେଟ୍ଅପ୍)
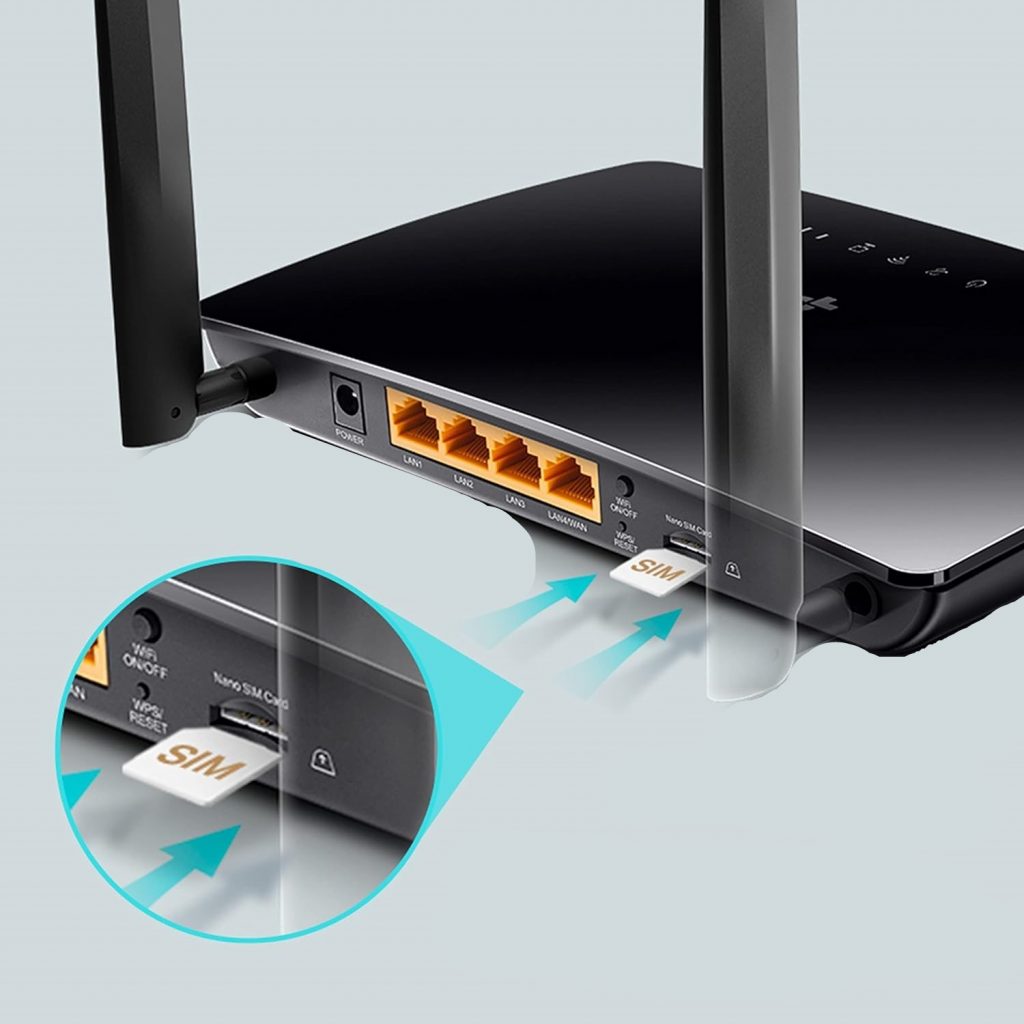
2a. Inserting the SIM Card (SIM କାର୍ଡ ଭର୍ତ୍ତି କରିବା)
- Locate the SIM Slot: (SIM ସ୍ଲଟ୍ ଚିହ୍ନିତ କରନ୍ତୁ)
- The SIM slot is typically on the back or bottom of the router.
- ସିମ୍ ସ୍ଲଟ୍ ସାଧାରଣତଃ ରାଉଟରର ପଛକିମ୍ବା ତଳେ ଥାଏ।
- Insert SIM Card: (SIM କାର୍ଡ ଭର୍ତ୍ତି କରନ୍ତୁ)
- Insert the SIM card into the slot with the gold contacts facing down. Push until it clicks into place.
- ସିମ୍ କାର୍ଡଟି ସ୍ଲଟ୍ ରେ ତଳକୁ ସୁର୍ଣ୍ଣ କନ୍ଟାକ୍ଟ ସହିତ ଲଗାନ୍ତୁ। ଏହାକୁ ଚିକ୍ କରିବାପର୍ଯ୍ୟନ୍ତ ଧକେଇବେ।
NOTE: For connectivity through 4G SIM mode, there is no need for Quick set – up.
4G ସିମ୍ ମୋଡ୍ ଦ୍ୱାରା ସଂଯୋଗ ପାଇଁ, କୌଣସି କ୍ୱିକ୍ ସେଟ୍-ଅପ୍ ଆବଶ୍ୟକତା ନାହିଁ।
2b. Switching to WAN Mode (WAN ମୋଡ୍କୁ ସ୍ୱିଚ୍ ହେଉଛି)
If you wish to connect via WAN – ISP (Internet Service Provider), follow these steps:
ଯଦି ଆପଣ WAN – ISP (ଇଣ୍ଟରନେଟ୍ ସେବା ପ୍ରଦାତା) ଦ୍ୱାରା ସଂଯୋଗ କରିବାକୁ ଚାହାଁତି, ତେବେ ଏହି ଚରଣଗୁଡ଼ିକୁ ଅନୁସରଣ କରନ୍ତୁ।
Connecting WAN Cable (WAN କେବୁଲ୍ ସଂଯୋଗ କରାଯାଉଛି)
Insert WAN Cable (WAN କେବୁଲ୍ ଭର୍ତ୍ତି କରନ୍ତୁ)
Connect the Ethernet cable from your modem or primary internet source to the WAN port on the TP-Link router.
ଆପଣଙ୍କର ମୋଡେମ୍ କିମ୍ବା ପ୍ରାଥମିକ ଇଣ୍ଟରନେଟ୍ ସ୍ରୋତରୁ ଇଥର୍ନେଟ୍ କେବଲ୍ କୁ TP-Link ରାଉଟରର WAN ପୋର୍ଟକୁ ଯୋଡ଼ନ୍ତୁ।
Configuring WAN Mode (WAN ମୋଡ୍ କନଫିଗର୍ କରାଯାଉଛି)
Access Web Interface (ୱେବ୍ ଇଣ୍ଟରଫେସ୍ ଆକ୍ସେସ୍ କରନ୍ତୁ)
Open a web browser and enter .http://tplinkmodem.net or 192.168.1.1.
ଏକ ୱେବ୍ ବ୍ରାଉଜର୍ ଖୋଲନ୍ତୁ ଏବଂ URL ଲେଖନ୍ତୁ- http://tplinkmodem.net or 192.168.1.1.
Log in with your admin credentials. (ଆପଣଙ୍କର ଆଡମିନ୍ ପ୍ରମାଣପତ୍ର ସହିତ ଲଗ୍ ଇନ୍ କରନ୍ତୁ।)
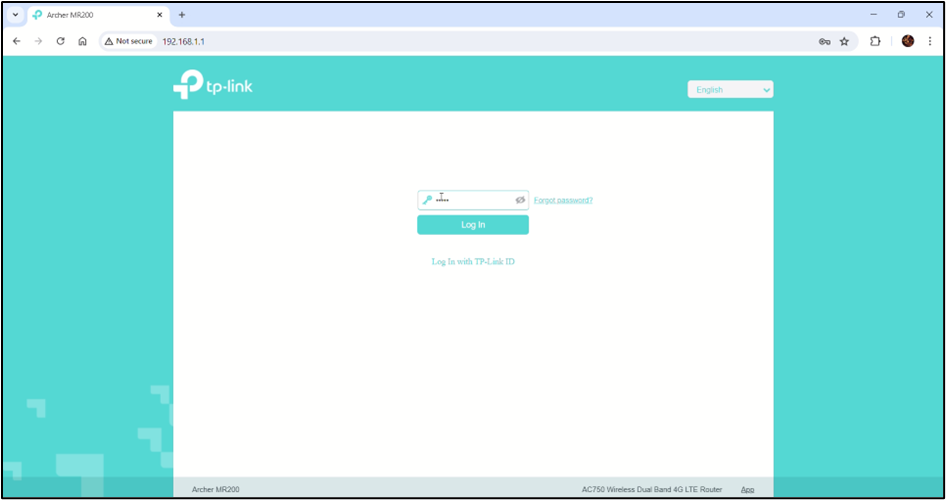
You can find the default user ID and password below the router.
ଆପଣ ରାଉଟର ତଳେ ଡିଫଲ୍ଟ ୟୁଜର ଆଇଡି ଏବଂ ପାସୱାର୍ଡ ପାଇପାରିବେ।
Navigate to WAN Settings (WAN ସେଟିଂସକୁ ନାଭିଗେଟ୍ କରନ୍ତୁ)
- After you login, navigate to Advanced and then to Operation Mode.
- ଲଗିନ୍ କରିବାପରେ, Advanced ରେ ଯାଆନ୍ତୁ ଏବଂ ପରେ Operation Mode କୁ ଚାଲିଯାଆନ୍ତୁ।
- You can switch between 3G/4G router mode or WAN connection.
- ଆପଣ 3G/4G ରାଉଟର୍ ମୋଡ୍ କିମ୍ବା WAN ସଂଯୋଗ ମଧ୍ୟରେ ସ୍ୱିଚ୍ କରିପାରିବେ।

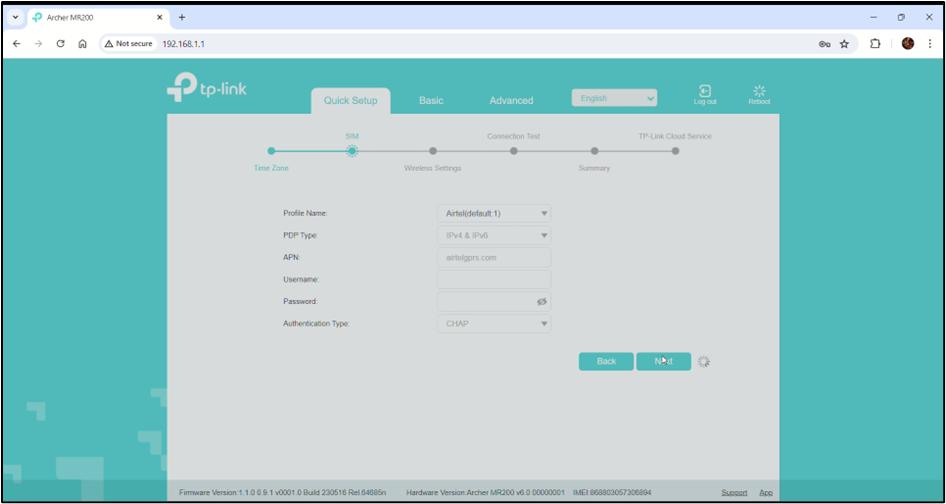
Select WAN Connection Type (WAN ସଂଯୋଗ ପ୍ରକାର ଚୟନ କରନ୍ତୁ)
Choose the appropriate connection type based on your requirements.
ଆପଣଙ୍କର ଆବଶ୍ୟକତା ଅନୁସାରେ ଉଚିତ ସଂଯୋଗ ପ୍ରକାର ଚୟନ କରନ୍ତୁ।
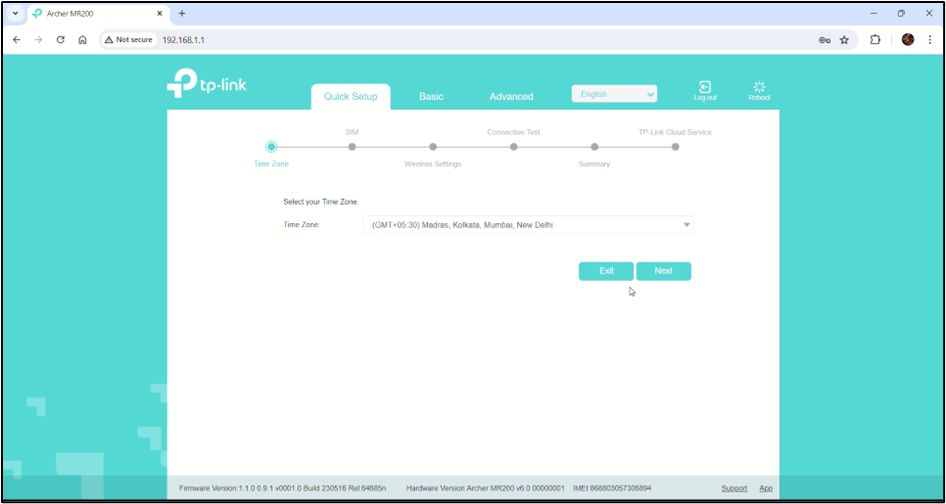
Quick WAN Set-up (ଶୀଘ୍ର WAN ସେଟ୍-ଅପ୍)
In the first step of Quick Setup, you need to select the appropriate time zone and click Next.
କ୍ୱିକ୍ ସେଟ୍-ଅପ୍ର ପ୍ରଥମ ପଦକ୍ଷେପରେ, ଆପଣଙ୍କୁ ଉଚିତ ସମୟ ମଣ୍ଡଳ ବାଛିବାକୁ ଓ Next ଉପରେ କ୍ଲିକ୍ କରିବାକୁ ପଡ଼ିବ।
In the next step, you can change the Tp Link Portal username and password if necessary.
ପରବର୍ତ୍ତୀ ପଦକ୍ଷେପରେ, ଆପଣ ଆବଶ୍ୟକତା ଅନୁସାରେ TP-Link ପୋର୍ଟଲ୍ ଉଜରନେମ୍ ଏବଂ ପାସୱର୍ଡ୍ ବଦଳାଇପାରିବେ।
In the next step, you can enable wireless connectivity and enter a new network name and password for the router wireless connection.
ପରବର୍ତ୍ତୀ ପଦକ୍ଷେପରେ, ଆପଣ ୱାୟରଲେସ୍ ସଂଯୋଗ ସକ୍ରିୟ କରିପାରିବେ ଏବଂ ରାଉଟର୍ ୱାୟରଲେସ୍ ସଂଯୋଗ ପାଇଁ ନୂତନ ନେଟୱର୍କ ନାମ ଏବଂ ପାସୱର୍ଡ୍ ଦାଖଲ କରିପାରିବେ।
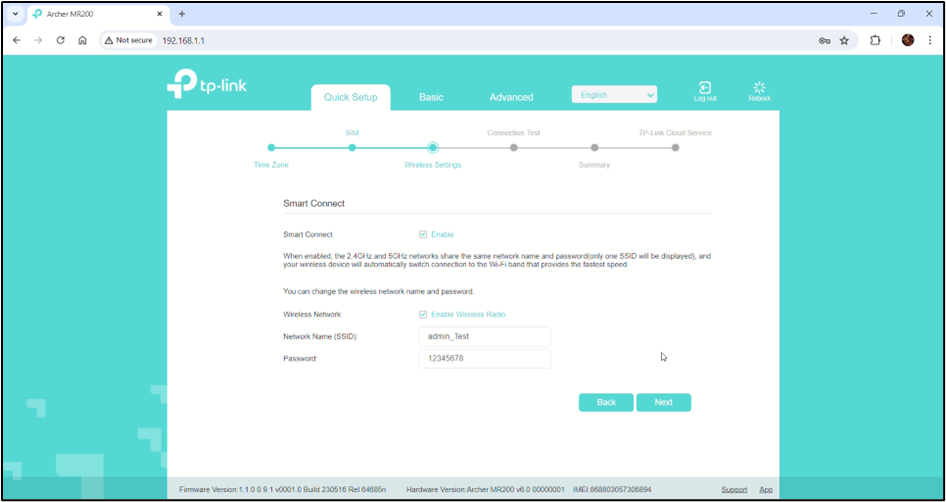
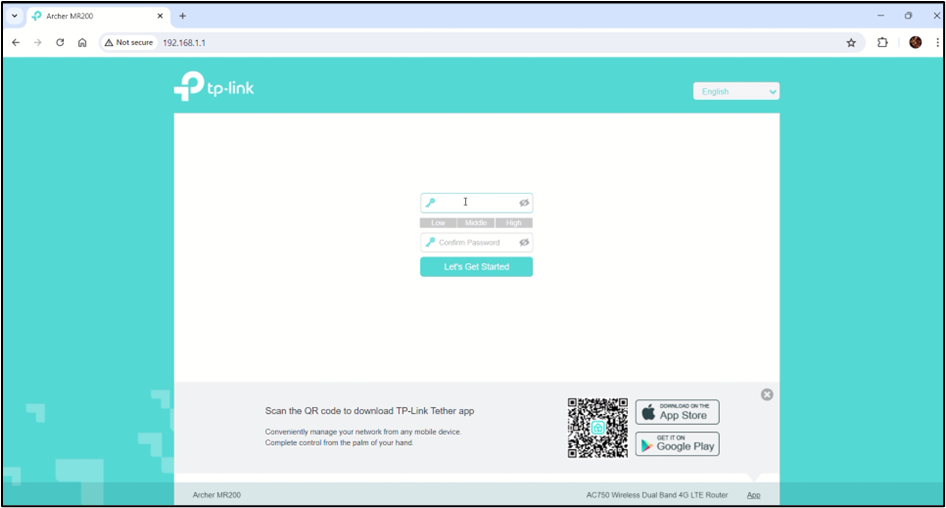
After clicking on Next, you will be prompted to enter a new password twice to confirm your new password for the router.
Next ଉପରେ କ୍ଲିକ୍ କରିବାପରେ, ଆପଣଙ୍କୁ ରାଉଟର୍ ପାଇଁ ନୂତନ ପାସୱର୍ଡ୍ ଦୁଇବେଳେ ଦାଖଲ କରିବାକୁ ଅନୁରୋଧ କରାଯିବ, ଯାହା ସହିତ ଆପଣ ନୂତନ ପାସୱର୍ଡ୍ କୁ ନିଶ୍ଚିତ କରିପାରିବେ।

In the next window, the Internet will be tested, along with a summary page with all the updated information.
ପରବର୍ତ୍ତୀ ୱିଣ୍ଡୋରେ, ଇଣ୍ଟରନେଟ୍ ପରୀକ୍ଷା କରାଯିବ, ସହିତ ସମସ୍ତ ଅପଡେଟ୍ ତଥ୍ୟ ସହିତ ଏକ ସାରାଂଶ ପୃଷ୍ଠା ଦିଖାଯିବ।
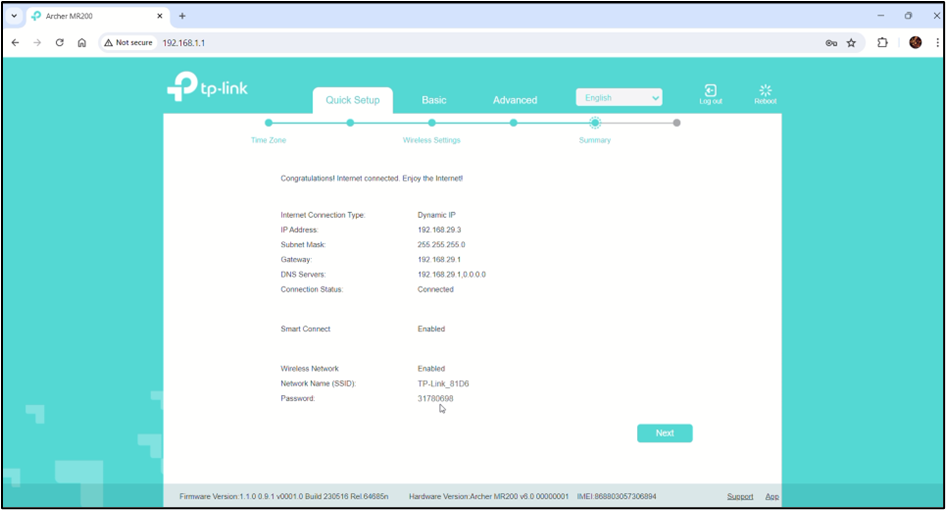
After clicking on Next, your network setup is successful.
Next ଉପରେ କ୍ଲିକ୍ କରିବାପରେ, ଆପଣଙ୍କର ନେଟୱର୍କ ସେଟ୍-ଅପ୍ ସଫଳ।

Testing the WAN Connection
- Check Connection Status: (ସଂଯୋଗ ସ୍ଥିତି ଯାଞ୍ଚ କରନ୍ତୁ)
- After the router reboots, check the status page in the web interface to ensure the WAN connection is active.
- ରାଉଟର୍ ରିବୁଟ୍ ହେବା ପରେ, ଓୟେବ୍ ଇଣ୍ଟରଫେସ୍ ରେ ସ୍ଥିତି ପୃଷ୍ଠା ଯାଞ୍ଚ କରି, WAN ସଂଯୋଗ ସକ୍ରିୟ ଅଛି ବୋଲି ନିଶ୍ଚିତ କରନ୍ତୁ।
- Verify Internet Access: (ଇଣ୍ଟରନେଟ୍ ପ୍ରବେଶ ପରୀକ୍ଷା କରନ୍ତୁ)
- Open a web browser and navigate to a website to confirm that the internet connection is working.
- ଏକ ଓୟେବ୍ ବ୍ରାଉଜର୍ ଖୋଲି, ଏକ ୱେବ୍ ସାଇଟ୍ ଉପରେ ଯାଇ ଇଣ୍ଟରନେଟ୍ ସଂଯୋଗ କାମ କରୁଛି ବୋଲି ନିଶ୍ଚିତ କରନ୍ତୁ।
3. Troubleshooting (ସମସ୍ୟା ନିବାରଣ)
- Make sure the router adaptor is connected properly and there is a proper flow of electricity to the router.
- ରାଉଟର୍ ଅଡାପ୍ଟର୍ ଠିକ୍ ଭାବରେ ସଂଯୋଗ ହୋଇଛି ବୋଲି ନିଶ୍ଚିତ କରନ୍ତୁ ଏବଂ ରାଉଟର୍ ପାଇଁ ଯଥାଯଥ ଭାବରେ ବିଦ୍ୟୁତ୍ ପ୍ରବାହ ହେଉଛି।
- Check that the 4G nano-sim is inserted properly and that the signal strength is full.
- 4G ନାନୋ-ସିମ୍ ଠିକ୍ ଭାବରେ ସ୍ଲଟ୍ ମଧ୍ୟରେ ଲଗାଯାଇଛି ଏବଂ ସିଗ୍ନାଲ୍ ଶକ୍ତି ପୂରା ଅଛି ବୋଲି ଯାଞ୍ଚ କରନ୍ତୁ।
- Make sure the Wi-Fi indicator is ON to confirm the Internet connection.
- ଇଣ୍ଟରନେଟ୍ ସଂଯୋଗ ନିଶ୍ଚିତ କରିବା ପାଇଁ, ୱାଇ-ଫାଇ ସୂଚକ ଅନ୍ ଅଛି ବୋଲି ନିଶ୍ଚିତ କରନ୍ତୁ।
Forgot the Admin Password: (ଆଡମିନ୍ ପାସୱାର୍ଡ ଭୁଲିଗଲି।)
- Reset the router to factory settings by pressing and holding the reset button for about 10 seconds.
- ପ୍ରାୟ 10 ସେକେଣ୍ଡ ଧରି ରିସେଟ୍ ବଟନ୍ ଦବାଇ ରଖି, ରାଉଟର୍ କୁ ଫ୍ୟାକ୍ଟରୀ ସେଟ୍ଟିଂସ୍କୁ ପୁନଃସ୍ଥାପିତ କରନ୍ତୁ।
4. Product Support (ଉତ୍ପାଦ ସମର୍ଥନ)
The TP-Link Router is mapped to a serial number and a QR code, which can also be scanned for the product serial number. It is to be provided to the support staff during the lodging of a product issue/complaint for easy identification of the product.
TP-Link ରାଉଟର୍ ଟି ସିରିୟଲ୍ ନମ୍ବର ଏବଂ QR କୋଡ୍ ସହିତ ସଂଯୁକ୍ତ, ଯାହା ଦ୍ୱାରା ପ୍ରୋଡକ୍ଟ୍ ର ସିରିୟଲ୍ ନମ୍ବର ସ୍କାନ୍ କରି ମିଳିବ। ପ୍ରୋଡକ୍ଟ୍ ସମସ୍ୟା କିମ୍ବା ଅଭିଯୋଗ ଦାଖଲ କରିବାବେଳେ, ସହଜ ପରିଚୟ ପାଇଁ ଏହା ସପୋର୍ଟ୍ କର୍ମଚାରୀଙ୍କୁ ଯୋଗାଇ ଦିଆଯିବା ଆବଶ୍ୟକ।
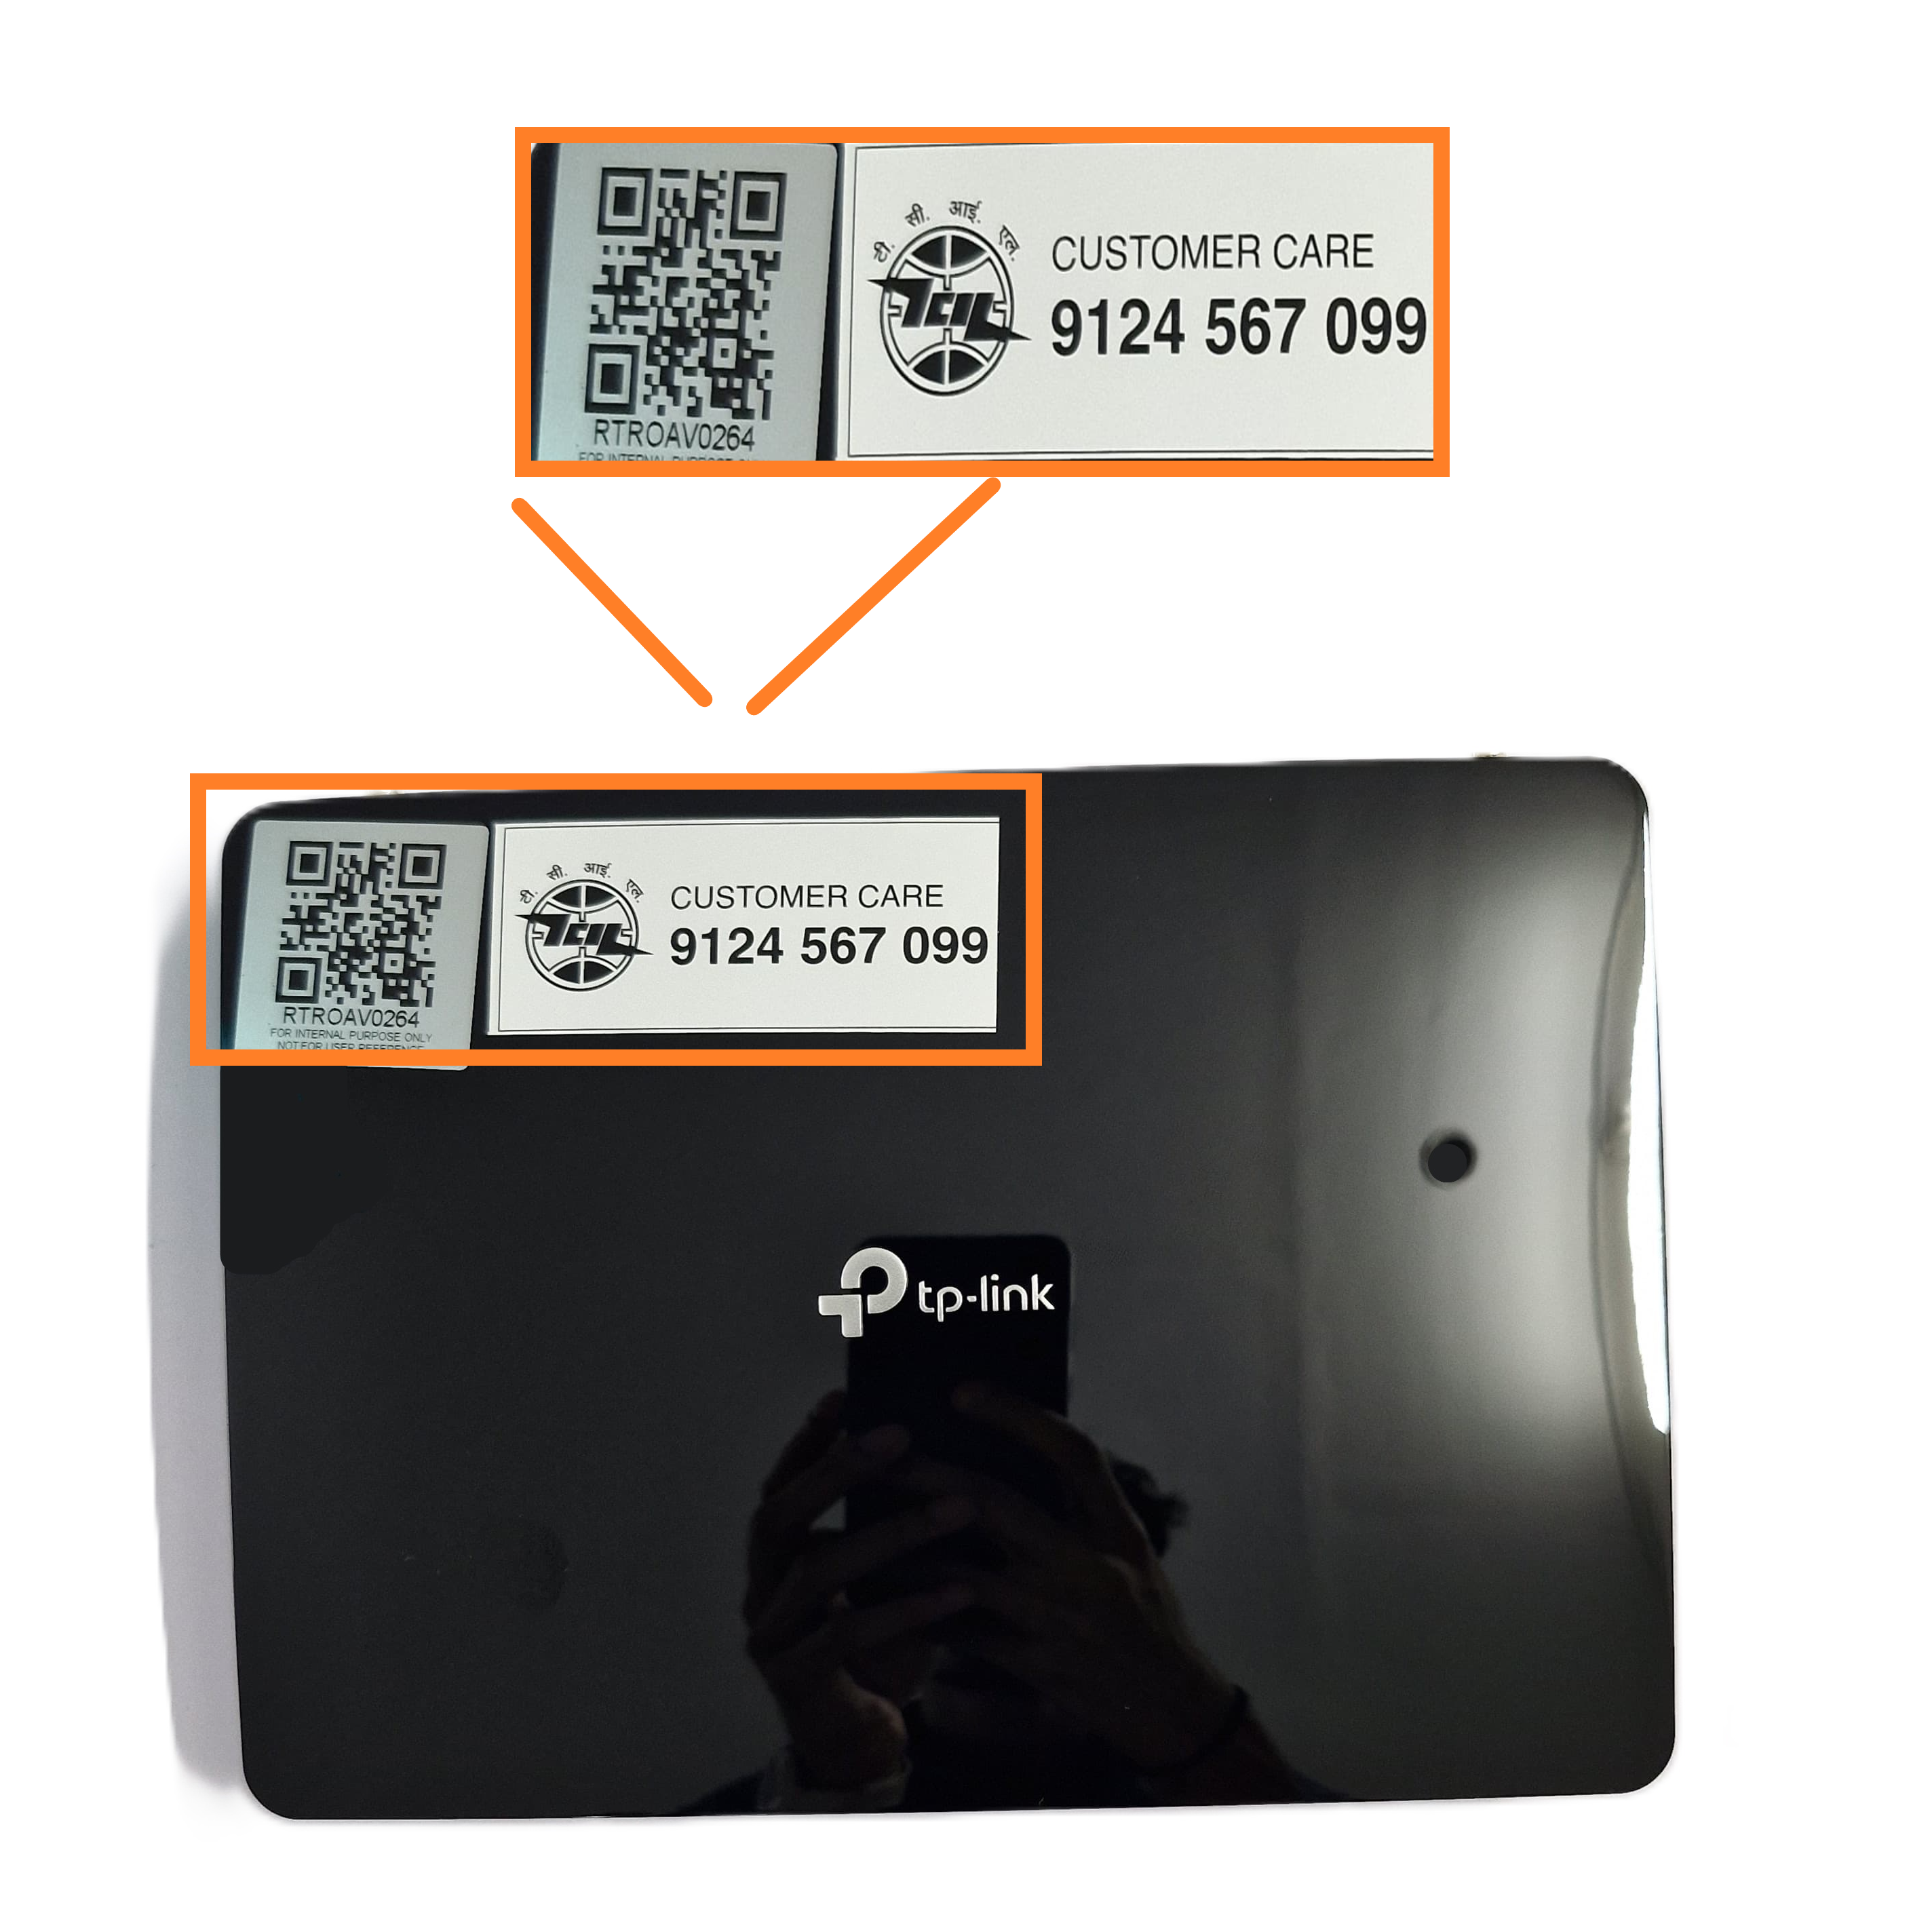
The product is provided with a customer care contact number. You can raise the product issue with the help of the serial number mentioned or by scanning the QR to fetch the serial number.
ପ୍ରୋଡକ୍ଟ୍ ସହିତ ଏକ କଷ୍ଟମର୍ କେୟାର୍ ସଂପର୍କ ନମ୍ବର ଯୋଗାଇ ଦିଆଯାଇଛି। ଆପଣ ପ୍ରୋଡକ୍ଟ୍ ସମସ୍ୟା ଉତ୍ତୋଳନ କରିବା ପାଇଁ ଉଲ୍ଲେଖିତ ସିରିୟଲ୍ ନମ୍ବର ବା QR କୋଡ୍ ସ୍କାନ୍ କରି ମିଳିଥିବା ସିରିୟଲ୍ ନମ୍ବରର ସହାୟତା ନେଇପାରିବେ।
For any queries or further assistance, please contact our Customer Support: (ଯେକୌଣସି ପ୍ରଶ୍ନ କିମ୍ବା ଅଧିକ ସହାୟତା ପାଇଁ, ଦୟାକରି ଆମର ଗ୍ରାହକ ସହାୟତା ସହିତ ଯୋଗାଯୋଗ କରନ୍ତୁ।)
- Phone: 9124 567 099
Email: helpdesk@ictschoollab.com